As I was nearing completion on the WPF app I described in an earlier post I became focused on how to easily build and deploy it to our developer and QA team. I had decided to use ClickOnce to facilitate easy updates, but I wanted to make it dead-simple to build and deploy the installer/updater to the network share so that anyone could easily contribute to the tool development.
At the time I’d been doing quite a bit of Powershell work and coincidentally I stumbled on the Github post on how they build the Github for Windows application. In that post I saw a tantalizing screen capture of their build/deploy script output and knew at once that I must have it.
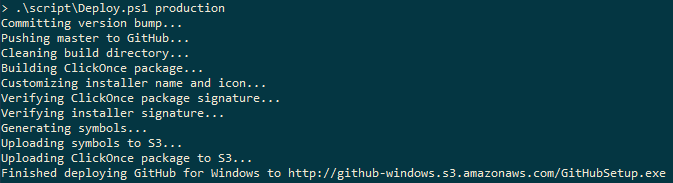
From that image I reverse engineered the steps my script needed to take, and then I had to figure out how to implement each step. It’s worth noting that ClickOnce setting manipulation and deployment is not available via scripting or MSBuild commands. The code below includes my solution to these issues.
Build & Deployment Script Output
Below is the output of my own build and deployment script. A couple of important notes:
- My application consisted of one .exe file and one .dll file corresponding to two projects in a single Visual Studio solution. In the example code below I’ve replaced my .exe project name with Executable and my .dll project name with Library. The ClickOnce settings are maintained in the Executable project file.
- I should note that a decision I made is that the installer version should always be the same as the executable version. For a small tool like this it makes things simpler than to version the installer independently of the application it installs.
1 2 3 4 5 6 7 8 9 | |
The script is written to be very silent unless an error occurs, so below is a description in more detail. The script does the following:
- Checks to ensure that the current user has prerequisites installed (in this case perforce).
- Checks out the appropriate files needed to increment the version number of the DLL, executable, and ClickOnce installer.
- Cleans the build directory.
- Builds the DLL and executable.
- Retrieves the (file) version of the newly-build executable.
- Forces (hacks) the executable version into the executable’s .csproj definition of the ClickOnce settings.
- Builds the installer with the new version and the just-built binaries.
- Copies all of the installer files to the appropriate network fileserver.
- Commit the changes to the AssemblyInfo and csproj files (i.e., the version changes).
Build & Deployment Script
Please note that I’ve changed a few things about the script below:
- Perforce repository paths
- Network deployment paths
- Binary names
I’ve included the entire (sanitized) script below, and after it describe in greater detail the interesting parts.
1 2 3 4 5 6 7 8 9 10 11 12 13 14 15 16 17 18 19 20 21 22 23 24 25 26 27 28 29 30 31 32 33 34 35 36 37 38 39 40 41 42 43 44 45 46 47 48 49 50 51 52 53 | |
Automated Version Increment
You may have noticed that I don’t take any specific action to manage the version numbers of Executable.exe and Library.dll even though I explicitly check out the AssemblyInfo.cs files.
The MSBuild Extension Pack is an open-source collection of MSBuild targets that make things like version management much easier. After adding the extensions to a relative path to my projects I just needed to add the following near the bottom of Executable.csproj.
1 2 3 4 5 6 7 8 9 10 11 12 | |
A couple things to note here:
- The
Conditionattributes on lines 5 & 6 ensure that the version increments only occur when I run theDeploy.ps1script, as opposed to every time I build through the Visual Studio IDE. - I am holding the Major and Minor versions fixed via lines 7-10, so that only the Build and Revision numbers are auto-incremented.
The above code is used both in Executable.csproj and Library.csproj, so that both the executable and the library have their version numbers managed. In doing this I can also change the major/minor versions of the executable and library independently.
Propagate Exe Version to ClickOnce Installer
As I mentioned earlier, I wanted to keep the installer version the same as the executable version. The problem was that there’s no way to manage the ClickOnce settings via MSBuild or other API. Lines 35-41 of the script are the, ahem, workaround that I devised.
Since we want to set the ClickOnce installer version to the same as the executable, we must first fetch the executable version:
1
| |
This line uses the powerful object piping capabilities in Powershell to fetch the FileVersion property from the assembly itself.
Once we have the executable version, we must then somehow insert it into Executable.csproj where the ClickOnce settings are defined. For reference, the associated XML from the csproj file is:
1 2 3 | |
Lines 35-41 read in the csproj file as XML and extracts the ApplicationVersion node. It then replaces the contents of that node with the assembly version we read from the executable and saves the entire XML structure back to the csproj file.
Summary
Through automating the build and deployment process I’ve learned a lot about Powershell and MSBuild and I’ll definitely be improving this in the future. The great thing about this particular combination of tools is that Powershell provides the glue that holds together the powerful build automation (and logging) that MSBuild offers.
While it’s unfortunate that ClickOnce has so many manual aspects to it (and I think I know why) the ease of XML manipulation and file processing from Powershell make it easy to work around ClickOnce’s lack of automation.
In the future I may look at moving the install/upgrade process to the WiX Toolset as it’s much more configurable and automatable. ClickOnce was really a stop-gap solution because it’s for an internal tool and simple enough for my bootstrapping needs.